my self build campervan
How we built our Motorhome,
Wednesday 28 July 2010
the latest
led from china, nice and cheap no p&p, blue tucked up into the SLD rail,
and red one for just above the sliding step for when wild camping to give a little light but not to light up the whole area.
left. the latest pic, incl the spice rack Sal wanted july 2010
Tv top left corner on bracket.
the straps for the sandles
the raised floor at the back, is split into two, front and back, back for ramps etc, front for tins and crusty bread and its slightly cooler in there, bread last longer and a new door fitted.
seats now covered in green material.
blue led light on
as usual a selfbuild is never finished, its just waiting to be modified.
&& more build
a veiw from the open back doors, the raised floor in the middle gives us storge for the ramps and a small tool box,
the carpet is temporary.
the cushions have since been altered, and memory foam added, and the whole thing covered in a green cover.
just about see the fridge, under sink on the left.
a pic of the shower room, the holes have been cut in the floor to accomodate two shower try outlets, but not fully fitted yet.
also the thetford has been changed for an electric one.
a Fiamma F45 3.5mtr awninghas been attached to the roof using two specific brackets for the f45 that bolt onto the lugs ontop of the ducato and two brackets for a F65 that has been modified in the middle of the awning.
& more build
the eye level cupboards were made in the same way as the rest3mm decorative ply, with 9mm framing.
The battery box,
this needed to serve two purposes as said earlier
1. obviouslythe battery box
2. part of the third bed, with pull out slats
the blue ropes, are fo loops to lift the whole lid, slats and lid clear of the box so you get clear access of batteries and gubbins
then with the passenger seat swivelled , it can be positioned so that the edges of the seat and box are level and flush.
the ebbyspacher heater is positioned under the drivers seat, anotehr reason for going for an ex ambulance
more build
had a 3 way in the last van, it didn't like being off level, 12v whilst travelling wasn't vry good at keeping temp, and in the end it ws tempramental, or just mental, worked when it wanted to.
so opted for a nice big compressor fridge, and boy was it worth it, we take choc ices and ices cream with us all the time now.
anyway, because of the shower room being quite big, had to put the sink above the fridge, but its boxed in, this ha made the ink a little high but not a problem as only washing up for a very short time.
built the seat boxes to the back of the van, to make the double bed, usd slats but made them into two sliding parts, so you can pull the smaller one over and use it as U shaped seating or for lounging, both out and base made of springy slats for bed, below this is the area for the wet gear and awning etc, added acces doors from inside the van eventually, saved opening the rear doors to look for something.
on the other side the seat box houses the gas locker at the very rear then clothes storage area,
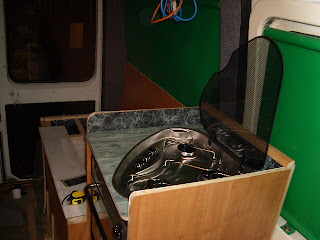
then the cooker unit.
the worktop is a piece of mermaid board used for board areas like swimming pool changing rooms etc, and the darker splash back is used for making fire hearths and surrounds, had it left over from teh house.
next is a small storage area for bottles etc, then the third travel seat.
small gallery for exiting SLD, then battery box, behind teh passenger seat. with welded frame to position it to teh right height, then boxed in o look better. provides extra storage anyway
building, building, building
After gluing the wal lining on to most of the wall sand ceiling, except teh shower, needed to decide just what we wanted.
A shower toilet, clothes hanging space, room for a compressor fridge, sink, oven, microwave, hob.
three travel seats, three births, seating area at rear to lounge around in. storage area for the driveaway awning, and walking gear, as well as storage for clothes, food etc etc.
wanting to keep the weight down, we decided to make our own 15mm walls, from cut down soft wood9mm, and sandwich this between two 3mm docrative lightweight ply, from magnums, a lot bought cheap because it had corners bashed off etc, but I didn't need them so wasn't a problem,
in fact we had bought nearly our stuff brand new but slightly damage/repairable, and again saved a small fortune.
first to be built was the shower/toilet walls, but before we were able to do this we had to know where to place the thetford, as we didn't want the hatch to foul a suport or upright, so few exploratory holes were drilled first, then the hatch was cut out using a a 1mm disc cutter, easy with GRP.
first we made a cradboard template as the roof and walls were all at differing angles, only draw back from not lining your own interior walls and ceiling.
and here is the wife Sal measuring up, ready to glue the 9mm studs.
i've never been so happy to look at a toilet hatch, strange innit. you can also see the wool type material that has been used to insulate the van walls.
spending spree, 1st of many
OUCH!
now the van had been cleared internally, we needed to get parts to fit. ebay came into play a lot as a cheap source of goodies for our van, and so did Magnum motorhomes in grimsby.
SPEND. SPEND.SPEND. luckily for us we have made some really good friends within the Self build club, who very kindly gave us loads of bits and pieces, and some even travelled up to help us with some of the build.
within a few weeks we had accuired, wall lining, thetford manual, shower tray, showerroom sink unit, and a whole host of other goodies.
so the build really began.
its quite scary just how many wires you can find lurking in the body work of an ambulance. so i added some more.
we could now plan just exactly what we wanted for our layout. and work out how to get three births and three travel seats without using a fixed front double.
we eventually found two swivel seats for the pricely sum of £60.00 if I remebr rightly, out of a citreon alambra(not sure on the spelling) in a scrap yard near norwich, two hour drive, but a good reason for a day out. now these unfortunaley wouldn't ust slot in, so I enlisted a friend with an arc welder, and we made a frame for each seat and mounted them in the front, also made a frame for the saved belted seat from the ambulance and mounted this by the side loading door, this one was a little trickier as it needed to be the same height as the battery box and passenger seat, when swivelled to make a bed for our daughter to sleep in. more luck than judgment I think, it worked, pics later.
Sunday 25 July 2010
a new beginning
very quickly we found the van for our next conversion a 2000 Ducato Maxi 2,8 transport ambulance.
a few reasons for wanting an ambulance,
the rear is partly if not fully insualted for you.
there is often a mass of 12volt electrical wires running front to back of teh body, that you can re-use, there is already a inner skin, saving a small fortune on internal building, so you can just glue wall lining to it. easy....
we drove for two hours to collect her, as we were soooo excited about having our new van and not wanting to get home too quickly, we decided that we would go for fish and chips in Lowerstoft, Norfolk, which would mean an extra couple of hours driving around in her.
thes epics show just after the ambulance livery wa removed except teh green stripes.
after a little struggle all the seats(except one) , disable lift, oxygen bottle and pipes, had been removed and sold, which added much needed funds to the build fund, allowing us to look for even more goodies to install in our soon to be motorcaravan.
Subscribe to:
Posts (Atom)